A key design principle of Linux is that information is stored in text-based files.
Text files include both flat files with rows of similar
information, such as configuration files in
/etc, and
Extensible Markup Language (XML) files, which define
data structure through text tags, seen in application configuration files
throughout both /etc and /usr.
The advantage of text files is that they can be moved or shared
between systems without requiring conversion, and can be
viewed and edited using any simple text editor.
Vim is an improved version of the vi editor distributed with Linux and UNIX systems.
Vim is highly configurable and efficient for practiced users, including such features
as split screen editing, color formatting, and highlighting for editing text.
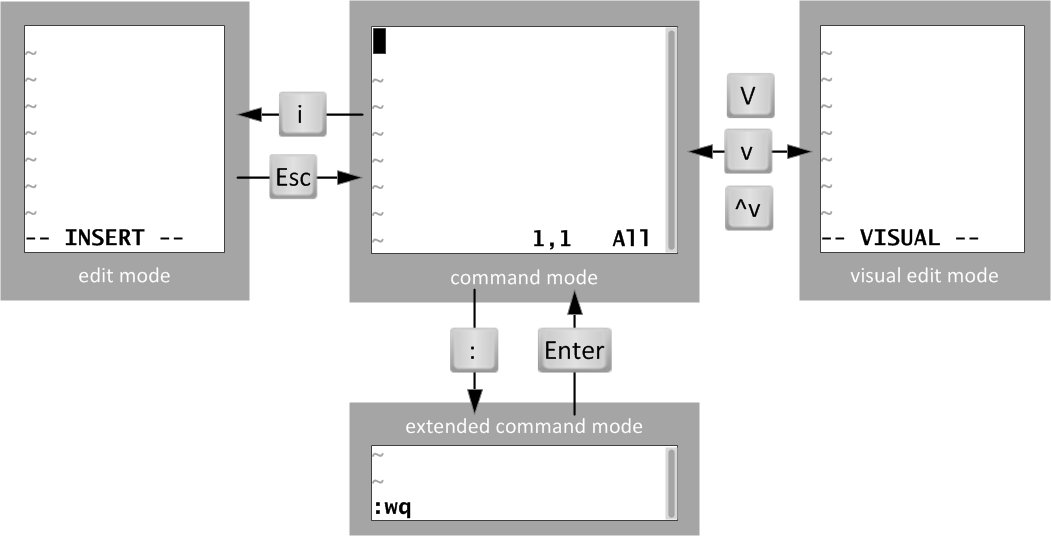
Moving between Vim modes
When first opened, Vim starts in command mode, used for navigation,
cut and paste, and other text manipulation. Enter each of the other modes with single
character keystrokes to access specific editing functionality:
-
An i keystroke enters insert mode,
where all text typed becomes file content.
Pressing Esc returns to command mode.
-
A v keystroke enters visual mode,
where multiple characters may be selected for text manipulation.
Use V for multi-line and Ctrl+v for block selection.
The same keystroke used to enter visual mode (v,
V or Ctrl+v) is used to exit.
-
The : keystroke begins extended command mode
for tasks like writing the file to save it, and quitting the Vim editor.
The Minimum, Basic Vim Workflow
Vim has efficient, coordinated keystrokes for advanced editing tasks.
Although considered useful with practice, Vim's capabilities can overwhelm new users.
The following workflow presents the minimum keystrokes every
Vim user must learn to accomplish any editing task.
-
Open a file with vim
filename.
-
Repeat this text entry cycle, as many times as the task requires:
-
Use arrow keys to position the cursor.
-
Press i to enter insert mode.
-
Enter text.
-
Press Esc to return to command mode.
-
If necessary, press u to undo mistaken edits on the current line.
-
Use arrow keys to position the cursor.
-
Repeat this text deletion cycle, as many times as the task requires:
-
Use arrow keys to position the cursor.
-
Press x to delete a selection of text.
-
If necessary, use u to undo mistaken edits on the current line.
-
Use arrow keys to position the cursor.
-
To save or exit, choose one of the following to write or discard file edits:
-
Enter :w to write (save) the file and remain in command mode for more editing.
-
Enter :wq to write the file and quit Vim.
-
Enter :q! to quit Vim, but discard all file changes since the last write.
-
Enter :w to write (save) the file and remain in command mode for more editing.
Rearranging Existing Text
In Vim, copy and paste is known as yank and put,
using command characters y and p. Begin by
positioning the cursor on the first character to be selected, then enter visual mode.
Use arrow keys to expand the visual selection. When ready, press y
to yank the selection into memory. Position the
cursor at the new location, then press p to put the selection at the cursor. This following workflow illustrates "yank and put" using visual mode.
-
Open a file with vim
filename.
-
Repeat this text selection cycle, as many times as the task requires:
-
Use arrow keys to position the cursor to the first character.
-
Press v to enter visual mode.
-
Use arrow keys to position the cursor to the last character.
-
Press y to yank (copy) the selection.
-
Use arrow keys to position the cursor at the insert location.
-
Press p to put (paste) the selection.
-
Use arrow keys to position the cursor to the first character.
-
To save or exit, choose one of the following to write or discard file edits:
-
Enter :w to write (save) the file and remain in command mode for more editing.
-
Enter :wq to write the file and quit Vim.
-
Enter :q! to quit Vim, but discard all file changes since the last write.
-
Enter :w to write (save) the file and remain in command mode for more editing.
Note
Beware the advanced Vim user offering shortcuts and tricks before the basics are mastered. Vim requires practice to become efficient. It is recommended to continue learning new keystrokes to extend Vim's usefulness. For those curious how extensive this can be, perform an Internet search for "Vim tips".Guided Exercise: Editing Files with Vim
In this exercise, you will use the Vim tutorial bundled with the editor to practice
entry-level vim editor techniques.
Start your Amazon EC2 instance and use ssh to log in as the user
Outcome
Basic competency in using the vim text editor, and knowledge of the vimtutor tutorial for future learning and practice.Before You Begin
Start your Amazon EC2 instance and use ssh to log in as the user
ec2-user.
Steps
- This exercise will use the existing Vim tutorial bundled with the Vim editor.
Your Amazon EC2 instance probably has a basic version of vim
installed, but not the fully enhanced version of vim which
includes the tutorial
and help files. Run the command sudo yum -y install vim-enhanced to
make sure that it is installed. Software installation will be discussed later in this
course.
[ec2-user@ip-192-0-2-1 ~]$sudo yum -y install vim-enhanced -
Run vimtutor. Read the Welcome screen and perform Lesson 1.1.
In the lecture, only keyboard arrow keys were used for navigation. In vi's early years, users could not rely on working keyboard mappings for arrow keys. Therefore, vi was designed with commands using only standard character keys, such as the conveniently grouped[ec2-user@ip-192-0-2-1 ~]$vimtutorh,j,k, andl. Here is one way to remember them:
hang back,jump down,kick up,leap forward. -
Return to the vimtutor window. Perform Lesson 1.2.
This early lesson teaches how to quit without having to keep an unwanted file change. All changes are lost, but this is better than leaving a critical file in an incorrect state. -
Return to the vimtutor window. Perform Lesson 1.3.
Vim has faster, more efficient keystrokes to delete an exact amount of words, lines, sentences, and paragraphs. However, any editing job can be accomplished using onlyxfor single-character deletion. -
Return to the vimtutor window. Perform Lesson 1.4.
The minimum required keystrokes are for entering and leaving edit mode, arrow keys, and deleting. For most edit tasks, the first key pressed isi. -
(Optional) Return to the vimtutor window. Perform Lesson 1.5.
In the lecture, only thei(insert) command was taught as the keystroke to enter edit mode. This vimtutor lesson demonstrates that other keystrokes are available to change the cursor placement when insert mode is entered. However, once in insert mode, all text typed is still file content. -
Return to the vimtutor window. Perform Lesson 1.6.
Save the file bywriting andquitting. This is the last lesson for the minimum required keystrokes to be able to accomplish any editing task. -
Return to the vimtutor window. Finish by reading the Lesson 1 Summary.
There are six more multi-step lessons in vimtutor. None are assigned as further lessons for this course, but feel free to use vimtutor on your own to learn more about Vim. - This concludes this exercise. Log out and stop your Amazon EC2 instance.


Comments
Post a Comment
thank you for visiting :)